Unlock Unprecedented Crunch: The Cereal Secret to Crispy Fried Squash
Summer brings an abundance of fresh produce, and for many, nothing beats the simple pleasure of perfectly fried squash. Yet, achieving that elusive, golden-brown exterior with a tender interior, without it turning soggy within minutes, can feel like a culinary quest. If you’ve ever despaired over limp fried zucchini or wished your golden-fried summer squash held its crunch longer, prepare for a revelation. The secret to truly Mastering Crispy Fried Squash: Tips for Lasting Crunch lies not in exotic ingredients or complicated techniques, but in a humble breakfast staple found in nearly every pantry: cereal.
This article will delve into the unconventional yet incredibly effective method of incorporating crushed cereal into your breading, transforming your fried squash into an unforgettable culinary experience. We’ll explore the science behind this crunchy innovation, guide you through a foolproof triple-dredge system, and provide essential frying tips to ensure every slice is a masterpiece of texture and flavor.
The Unconventional Secret to Ultimate Crispy Fried Squash: Cereal Power!
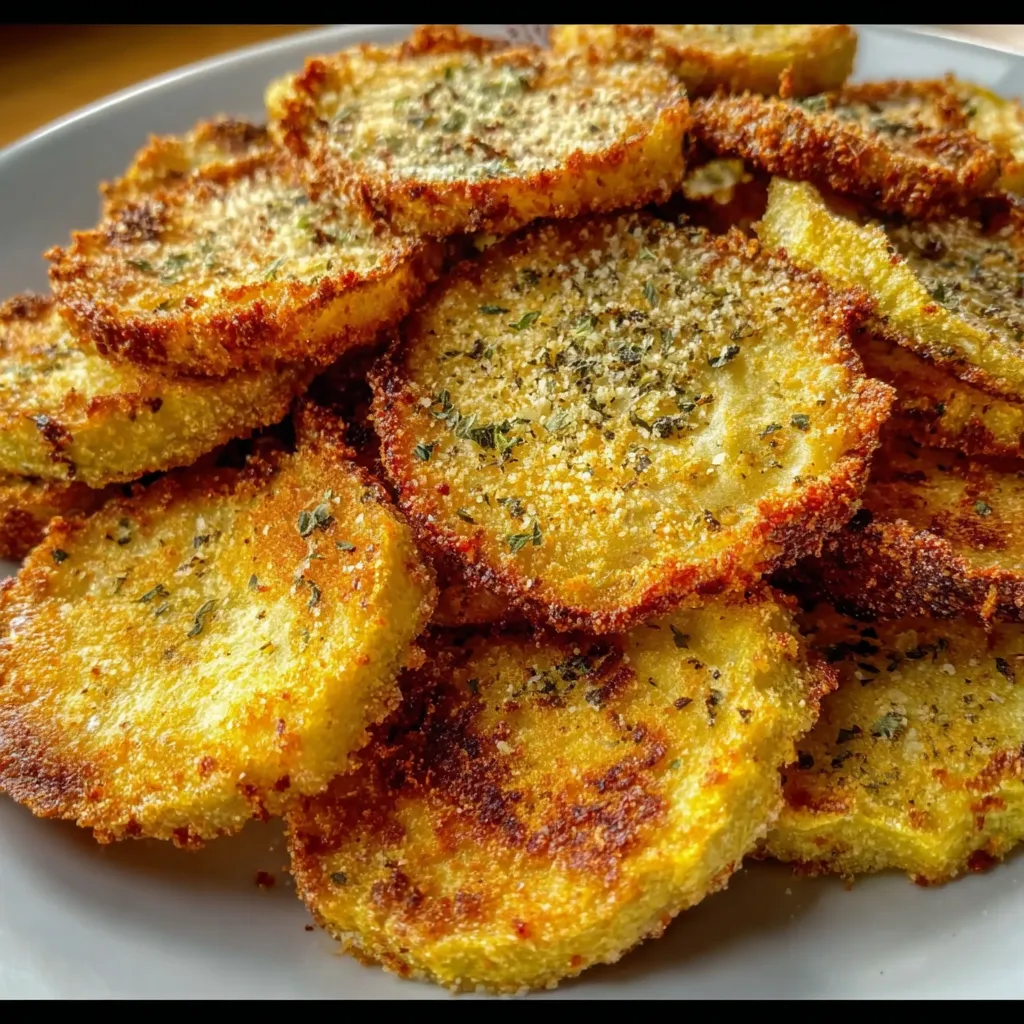
Forget everything you thought you knew about traditional breading for fried vegetables. While flour, cornmeal, and even panko breadcrumbs offer a decent crisp, none deliver the extraordinary, lasting crunch quite like crushed cereal. Specifically, Southern Fried Squash: Crispy, Gluten-Free & Versatile Options often highlight cornmeal, but for next-level crispiness, embrace the cereal. The magic lies in the unique, flaky texture of cereals like Corn Flakes or Rice Krispies. When crushed, these cereals create a multifaceted coating with countless nooks and crannies that crisp up beautifully in hot oil, resulting in a shatteringly crisp exterior unlike any other.
Beyond the immediate crunch, this cereal coating acts as a superior barrier, helping to seal in moisture and dramatically extending the crispiness of your fried squash. This means less sad, soggy squash and more time to savor that satisfying crunch. Both Corn Flakes and Rice Krispies, including their generic counterparts, perform exceptionally well. Rice Krispies offer a slightly finer, more uniform crunch, while Corn Flakes provide larger, more varied flakes that contribute to a truly rustic and robust crisp. Experiment with both to discover your personal preference!
Crushing Your Way to Perfection: Cereal Preparation
The texture of your crushed cereal is key to the final outcome. You want a mix of finely ground pieces and some slightly larger flakes for optimal crunch and visual appeal. Avoid turning it into a fine powder, which can create a dense, heavy coating rather than a light, airy crisp.
- Food Processor: The quickest and most efficient method. Pulse the cereal in a mini or full-size food processor until you achieve a coarse grind with a combination of fine and larger pieces. Be careful not to over-process.
- By Hand: For those without a food processor, a Ziploc bag and a rolling pin (or even a sturdy glass bottle) work wonders. Place the cereal in the bag, seal it, and roll or bash until you reach the desired consistency. This method also allows for more control over the texture.
Once crushed, your cereal is ready to become the star of your dredging station.
Mastering the Triple Dredge: A Step-by-Step Guide for Perfection
The secret to any well-coated fried food lies in a meticulous dredging process. For crispy fried squash, a three-step method ensures maximum adhesion and a robust, flavorful crust. Remember to season each layer, building flavor from the inside out.
Step 1: The Flour Foundation
Your first dredge is a seasoned flour base. This initial layer is crucial because it helps absorb any residual moisture from the squash and provides a dry surface for the egg wash to cling to. Without it, the egg and subsequent cereal coating won't stick properly, leading to an uneven and disappointing crust.
- Ingredients: All-purpose flour (or a gluten-free alternative like cornstarch, potato starch, rice flour, or a GF blend), salt, black pepper, and any desired spices such as paprika, garlic powder, or onion powder.
- Technique: Lightly coat each squash slice in the seasoned flour, ensuring it's evenly covered. Gently shake off any excess flour.
Step 2: The Egg-cellent Adhesion Layer
The second dredge is the binding agent. Beaten eggs, often mixed with a splash of milk, create a sticky surface that allows your final crunchy coating to adhere firmly to the squash. Seasoning the egg wash further enhances the overall flavor profile.
- Ingredients: Beaten eggs (2-3, depending on squash quantity), a splash of milk (dairy or unsweetened dairy-free), salt, and pepper.
- Technique: Dip each floured squash slice into the egg mixture, ensuring it's fully saturated. Let any excess drip off briefly before moving to the final dredge.
Step 3: The Cereal Crown: Where Crispy Dreams Come True
This is where the magic happens! The final dredge is your crushed cereal mixture, combined with other flavor enhancers. This layer is responsible for the incredible crunch and often, the rich savory notes of your fried squash.
- Ingredients: Coarsely crushed Corn Flakes or Rice Krispies, finely shredded Parmesan cheese (optional, but highly recommended for umami), and dried oregano (or other herbs like thyme, basil).
- Technique: Place an egg-coated squash slice into the cereal mixture. Press firmly on both sides, ensuring a thick, even layer of coating sticks to the squash. Don't be shy – the more firmly you press, the better the coating will adhere, resulting in a crispier, more satisfying crust. Make sure every inch is covered!
Frying Fundamentals: Heat Management for Golden Crispiness
Dredging is only half the battle; proper frying technique is paramount for achieving that perfect golden, extra crispy fried squash. The right oil temperature is non-negotiable for a professional-grade finish.
- Oil Selection: Use an oil with a high smoke point, such as vegetable oil, canola oil, peanut oil, or grapeseed oil.
- Temperature is Key: The oil must be hot enough when you add the squash. A tell-tale sign is a gentle sizzle when the squash hits the pan. If the oil isn't hot enough, the coating won't crisp up quickly; instead, it will absorb oil, leading to a greasy, soggy result. Aim for approximately 350-375°F (175-190°C).
- Maintain Medium Heat: Once the squash is in the pan, reduce the heat to medium. This prevents the oil from burning and ensures the coating cooks to a beautiful golden brown without scorching, while allowing the squash inside to become tender. Medium heat also helps minimize splatter, making for a safer and cleaner cooking experience.
- Don't Crowd the Pan: Fry in batches if necessary. Overcrowding the pan will drop the oil temperature significantly, leading to less crispy squash. Give each piece enough space to cook evenly.
- Golden Perfection: Fry until each side is beautifully golden brown and the squash is tender. This usually takes only a few minutes per side.
- Draining: Once fried, transfer the squash to a wire rack set over a paper towel-lined baking sheet to drain any excess oil. This final step is crucial for maintaining crispiness.
Beyond the Basics: Variations, Substitutions, and Dietary Adaptations
While the cereal secret is a game-changer, this versatile recipe can be adapted to various tastes and dietary needs. Whether you prefer Southern Fried Squash: Crispy, Gluten-Free & Versatile Options or are simply looking to tweak the flavors, there are plenty of possibilities.
Squash Varieties
This recipe works beautifully with both yellow summer squash and zucchini. Both are abundant in late spring and summer, offering a slightly different flavor and texture profile, but both yield fantastic results. You can even use a combination of the two!
Coating Alternatives (If Cereal Isn't an Option)
While cereal is king for ultimate crispiness, other options exist:
- Panko Breadcrumbs: Panko comes closest to cereal in terms of creating a crispy texture. Its larger, flakier crumb allows for a good crunch.
- Cornmeal or All-Purpose Flour: These are traditional choices, especially in Southern cooking. They will create a crust, but it won't be as intensely crispy or long-lasting as a cereal coating.
Gluten-Free Adaptations
For those following a gluten-free diet, enjoying crispy fried squash is absolutely possible:
- First Dredge: Substitute all-purpose flour with cornstarch, potato starch, rice flour, or a high-quality all-purpose gluten-free flour blend.
- Cereal Coating: Opt for Rice Krispies cereal, as it is naturally gluten-free. Always double-check labels, especially for generic brands, to ensure they don't contain hidden gluten ingredients.
Flavor Twists
Don't limit yourself to just Parmesan and oregano. Consider:
- Spicy Kick: Add a pinch of cayenne pepper or chili powder to your flour dredge or cereal mixture.
- Herbaceous: Experiment with dried dill, rosemary, or a touch of herbes de Provence.
- Cheesy Variations: Try a different hard cheese like Asiago or Pecorino Romano in the cereal layer.
Beyond Frying
While frying offers the ultimate crunch, you can also achieve a good level of crispiness through oven-baking or air-frying. For an oven-fried version, lightly mist the coated squash with cooking spray and bake at a high temperature (around 400°F/200°C) until golden and crispy, flipping halfway. Air fryers also yield excellent results with minimal oil.
Conclusion
Say goodbye to mediocre, soggy fried squash and embrace a new era of culinary delight. The cereal secret, combined with a precise triple-dredge system and careful frying techniques, will elevate your crispy fried squash to an art form. This simple yet revolutionary trick ensures every bite delivers an unparalleled crunch that lasts, making it the perfect side dish, appetizer, or snack for any occasion. Don't just fry squash; master it with the magic of cereal. Your taste buds will thank you!
